Wednesday, February 16, 2011

Activating and Deactivating Features with PowerShell in SharePoint 2010


I was looking at the analytics of the site the other day and I noticed that my post, Adding and Deploying Solutions with PowerShell, currently has the most traffic on the site.  I had always intended to write a follow up post on this, so here it is.  Today I’m going to talk about how to enable and disable features using PowerShell.  It’s great that you know how to deploy solutions now with PowerShell, but now you want to activate your features.In SharePoint 2007 to activate a feature from the command line you might have used a statement like the one below.  I’ll use the Reporting feature on my server named sp2010 as an example.  The value specified in the name parameter refers to the actual folder name of the feature that is in your SharePoint Root folder (14 hive).

stsadm.exe –o activatefeature –name Reporting –url http://sp2010
To get started with PowerShell, run the SharePoint 2010 Management Console located in your Microsoft SharePoint 2010 Products folder on your start menu.  This automatically loads the Microsoft.SharePoint.PowerShell snapin so that we can execute SharePoint commands.    You might have noticed earlier that I said we will talk about enabling and disabling features.  The words enable and disable are key here because PowerShell uses those verbs to activate and deactivate features.  To issue the same command above but with PowerShell, we use the Enable-SPFeature command.  The rest of the syntax is pretty similar as you can see below.  Just use –Identity to specify the name of the feature.  You can even pass the –Force command like you could with stsadm.exe.
Enable-SPFeature –Identity Reporting –url http://sp2010
If your command worked successfully, you will see nothing and just get a blank prompt back.
PowerShellEnableSPFeatureNoOutput
If you would like to get some feedback from the command, you can have it return the SPFeature object back to you by specifying the –PassThru parameter.
PowerShellEnableSPFeaturePassThru
We can confirm that the feature did in fact activate successfully using the SharePoint UI.
PowerShellReportingFeatureEnabledUI
Can we confirm that the feature is enabled with PowerShell?  Yes, we can by using Get-SPFeature.  Now this cmdlet behaves differently depending upon the parameters passed through it.  For example, if you type the following, it lists every feature on the SharePoint farm along with its Id and Scope.
Get-SPFeature
However, if you want to know which features are enabled, you can pass it a URL for a given scope (i.e.: –Web, –Site, –WebApplication, and –Farm).  So to get a list of all Site Collection scoped features, we would use the –Site parameter.
Get-SPFeature –Site http://sp2010
PowerShellGetSPFeatureSite
You can still specify a specific feature or even use Where-Object to query the list as well.
Get-SPFeature –Identity Reporting –Site http://sp2010
PowerShellGetSPFeatureSiteSpecific
If you get something like you see in the screenshot above, you know the feature has been activated.  When the feature hasn’t been activated, you will get a lovely red error message.
PowerShellGetSPFeatureSiteSpecificNotEnabled
The Enable-SPFeature command can also take a Pipe Bind from Get-SPFeature.  This means that you could even activate multiple features at once this way.  I’ll include an example of this in the future.
At some point, you will want to disable that feature you activated.  As you probably guessed, the cmdlet you want is Disable-SPFeature.  You use the same parameters that you use with Enable-SPFeature.  When you execute the command, it prompts for confirmation as you can see in the screenshot.
Disable-SPFeature –Identity Reporting –url http://sp2010
PowerShellDisableSPFeatureWithConfirmation
If you want to disable confirmation, you can pass the –confirm:$false parameter.
Disable-SPFeature –Identity Reporting –url http://sp2010 –Confirm:$false
PowerShellDisableSPFeatureNoConfirmation
Setting the confirm parameter eliminates the confirmation prompt and you can use it with other PowerShell cmdlets as well.  That is all that is involved in activating and deactivating features with PowerShell.  It’s pretty easy.   Hopefully, you can incorporate these commands in your deployment scripts.

Adding and Deploying Solutions with PowerShell in SharePoint 2010


Visual Studio 2010 makes it really easy to add and deploy solutions when you are developing, but you may eventually want to deploy those solution packages elsewhere right?  We can still use stsadm, but that is effectively considered deprecated now in favor of PowerShell.  In the past to add a solution, we used an stsadm command like the one below.  In today’s example, we’ll be working with a package called SharePointProject2.wsp on my server named sp2010.
stsadm –o addsolution –name SharePointProject2.wsp
To get started with PowerShell, run the SharePoint 2010 Management Console located in your Microsoft SharePoint 2010 Products folder on your start menu.  This automatically loads the Microsoft.SharePoint.PowerShell snappin so that we can execute SharePoint commands.  To install a solution we use the Add-SPSolution command.  If you are using a Sandboxed solution you would use Add-SPUserSolution instead.  It takes just one parameter, –literalpath, which is the path to the solution file.  One thing that is different is that you must specify the full path to the file for some reason.  I haven’t been able to get it to take a path to the solution in the current folder even if I make use of .\ before the filename.  Here is an example.
Add-SPSolution c:\code\SharePointProject2\bin\debug\SharePointProject2.wsp
In this case you don’t actually have to type –literalpath before the parameter.  This is what it looks like when executed.  You can see that it displays the id of the solution along with its deployment status.
PowerShellAddSolution
Now we need to deploy the solution.  In the past, we used an stsadm command like the following.
stsadm –o deploysolution –name SharePointProject2.wsp –url http://moss-server –allowCasPolicies –immediate
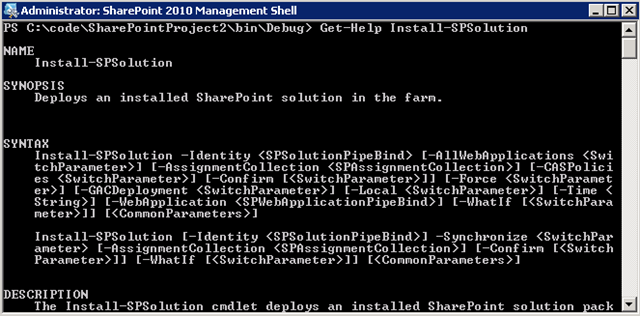
We would also follow this up with a call to stsadm with the execadmsvcjobs operation.  To do the same operation in PowerShell, we use the Install-SPSolution command (again use Install-SPUserSolution for Sandboxed solutions).  You can use the Get-Help command (i.e.: Get-Help Install-SPSolution) to get more information on a command but it’s not always obvious what it is expecting as you can see below.  That is why I am writing the post today.
PowerShellGetHelpInstallSolution
The first parameter you need is the –Identity parameter.  This is the name of the solution package (i.e.: MySolution.wsp).  Depending on if you are using the GAC or Code Access Security, you will specify either –GACDeployment or –CASPolicies.  You then need to specify a specific web application using the –WebApplication parameter or –AllWebApplications to deploy it to all web applications (assuming the manifest allows it).  If you need to force the deployment, you can still use the –Force command.  Here is what an install command might look like.
Install-SPSolution –Identity SharePointProject2.wsp –WebApplication http://sp2010 -GACDeployment
I’ll point out that executing this command actually does do the deployment operation.  You don’t have to fire off something to execute a job later like you did with stsadm.
You might want to update your solution, so we’ll talk about how to do that as well.  Here is what your stsadm command might have looked like in WSS3.  Which would also be followed up with an execadmsvcjobs operation.
stsadm –o upgradesolution –name SharePointProject2.wsp –filename SharePointProject2.wsp –immediate –allowCasPolicies
The upgrade solution syntax is similar to the others.  We just have to specify an identity and a literalpath with the Update-SPSolution command.  The identity is the name of the package on the server to upgrade and the literalpath is the full path to the new solution package on the file system.  Here is what that might look like.
Update-SPSolution –Identity SharePointProject2.wsp –LiteralPath c:\code\SharePointProject2\bin\debug\SharePointProject2.wsp –GACDeployment
We’ve talked about everything else, so we’ll finish it up by talking about retraction and removal.  To retract a solution we use the Uninstall-SPSolution command.  By now you are probably noticing a pattern in the way things are named.  Install –> Deploys, Uninstall –> Retracts.  It also just uses the -Identity parameter and the –WebApplication parameter.  You can also use the –AllWebApplications parameter to retract it from all web applications. Many of these commands may prompt you with an “Are you sure?” type prompt.  You can skip this prompt by adding a –confirm parameter.  Here is what it looks like.
Uninstall-SPSolution –Identity SharePointProject2.wsp –WebApplication http://sp2010
Lastly, to remove the package from the solution store, we use the Remove-SPSolution command.  It just takes the name of the package.
Remove-SPSolution –Identity SharePointProject2.wsp
I hope this helps.  If you’re like me, it’s one thing to see the docs on something, but I like to see real examples.  There aren’t any examples in the Get-Help command yet.  This should cover all of the common commands that you probably used to used with stsadm in regards to solution deployment.  The nice thing is that you can script these things together very easily and create highly flexible PowerShell scripts.  Expect a few more posts soon on the basics of working with PowerShell and SharePoint 2010.

Wednesday, December 22, 2010

Security Trimmed Controls in SharePoint

To apply permissions for a controls in SharePoint, use the below code.

<sharepoint:spsecuritytrimmedcontrol permissions=”ManageLists” runat=”server”>
Place your control(s) here
</sharepoint:spsecuritytrimmedcontrol>

Available Permissions:

AddAndCustomizePages
AddDelPrivateWebParts
AddListItems
ApplyStyleSheets
ApplyThemeAndBorder
ApproveItems
BrowseDirectories
BrowseUserInfo
CancelCheckout
CreateAlerts
CreateGroups
CreateSSCSite
DeleteListItems
DeleteVersions
EditListItems
EditMyUserInfo
EmptyMask
EnumeratePermissions
FullMask
ManageAlerts
ManageLists
ManagePermissions
ManagePersonalViews
ManageSubwebs
ManageWeb
Open
OpenItems
UpdatePersonalWebParts
UseClientIntegration
UseRemoteAPIs
ViewFormPages
ViewListItems
ViewPages
ViewUsageData
ViewVersions

Sunday, November 28, 2010

About SharePoint

Share Point Introduction

Microsoft SharePoint Server (formerly known as Microsoft Office SharePoint Server) is a Microsoft proprietary software product build on the ASP.NET framework. SharePoint Server works with Microsoft IIS web server to produce sites intended for collaboration, file sharing, social networking and web publishing. SharePoint server farms can host web sites, portals, intranets, extranets, Internets; web content management systems, search engine, wikis, blogs, social networking, business intelligence, workflow as well as providing a framework for web application development.
SharePoint only runs on Microsoft Windows Server and requires the ASP.NET framework be installed. Current SharePoint 2010 was developed on ASP.NET 3.5 and is not compatible with ASP.NET 4. SharePoint also requires a database. SharePoint only works with Microsoft SQL Server or Microsoft SQL Server Express database.

Microsoft has defined the following key capacities for SharePoint 2010. Most of these are supported with the 2007 product unless indicated.

Sites:
SharePoint 2010 Sites provides single infrastructure for all your business Web sites. SharePoint can be used to create sites from Internet to extranet sites through Intranet Portals, blogs, wikis, to team sites.

Communities:
SharePoint 2010 Communities provide collaboration tools including a social community and collaborative creation of content. Key community tools include collaborative document management, discussion forums, blogs, wikis and a Social Networking solution called MySites.

Composites:
SharePoint 2010 introduced Composites. Composites offer tools and components for creating and distributing "do-it-yourself" business solutions. Composites allow users to create solutions to business problems in graphic tools without having to create or compile code by hand. Composites will allow users to share their solutions with other users on the SharePoint Server farm.
Composites aim to allow users to enable users to create solutions to business problems with familiar tools or in a web browser. The goal is that no code will be required to make the solution. These solutions can then be distributed through an enterprise via SharePoint Server. Composites will allow Enterprise web distribution of Microsoft Office products like Visio, Excel, and Access databases. There is also the ability to use the web page to build custom web parts. SharePoint Designer also offers users the ability to create solutions without code.

Content:
SharePoint provides a Web Content Management platform for publishing web sites. It also provides a Document Management solution for collaborative document production.

Insights:
SharePoint 2010 can be used to surface business information in databases, reports, business applications and other applications.

Search:
SharePoint comes with its own Enterprise search. SharePoint can also be implemented using Fast.com for improved search. The new SharePoint search now supports query syntax allowing search strings to contain OR, AND and NOT to refine the logic of the search. This now provides Boolean search which was not supported in earlier versions. SharePoint Server 2010 now also supports wild card search using the '*' character. SharePoint Server 2010 Search platform provides search of community data held in SharePoint MySites. Search is now designed to provide tacit knowledge about users and authors as well as semantic meaning. SharePoint now provides FAST search technology as a potential added feature. FAST provides vastly most sophisticated search and can index up to a half billion documents.

Sunday, November 14, 2010

Get details from announcment list

using (site = SPContext.Current.Site)
{
using (web = SPContext.Current.Web)
{
myLib = web.Lists["Announcements"];
libItems = myLib.Items;
if (libItems.Count == 0)
{
lblMsg.Text = "There are no items to show in this \"" + myLib.ToString() + "\"";
clearGrid();
}
else
lblMsg.Text = "";
libItems = myLib.Items;
DataTable dt = new DataTable();
dt.Columns.Add("ImageURL", typeof(string));
dt.Columns.Add("Title", typeof(string));
dt.Columns.Add("Body", typeof(string));
dt.Columns.Add("Height", typeof(string));
dt.Columns.Add("Width", typeof(string));
dt.Columns.Add("URL", typeof(string));
dt.Columns.Add("UName", typeof(string));
dt.Columns.Add("Time", typeof(string));
dt.Columns.Add("AddNew", typeof(string));
if (libItems.Fields.ContainsField("Body") == true && libItems.Fields.ContainsField("ImageURL") == true)
{
foreach (SPListItem item in libItems)
{
string imageURL = item["ImageURL"].ToString();
string title = item["Title"].ToString();
string body = item["Body"].ToString();
string listURL = myLib.DefaultDisplayFormUrl +"?ID="+item.ID;
string userName = item["Author"].ToString();
string[] uName = userName.Split('#');
string Time = item["Created"].ToString();
string addNew = item.Web.Url + myLib.DefaultNewFormUrl;
int length = body.Length;
if (length >= 200)
body = body.Substring(0, 200) + "...";
dt.Rows.Add(imageURL, title, body, strPtyImgHeight, strPtyImgWidth, listURL,uName[1], Time, addNew);
}
dtlGetAnnouncement.DataSource = dt;
dtlGetAnnouncement.DataBind();
hlnkAddnew.NavigateUrl = web.Url + myLib.DefaultNewFormUrl; ;
}
else if (libItems.Fields.ContainsField("Body") == false)
{
lblMsg.Text = "There are no Column Name 'Body' in your \"" + myLib.ToString() + "\"";
clearGrid();
}
else if (libItems.Fields.ContainsField("ImageURL") == false)
{
lblMsg.Text = "There are no Column Name 'ImageURL' in your \"" + myLib.ToString() + "\"";
clearGrid();
}
}
}

Monday, November 1, 2010

SharePoint Basic Source Codes

Get Discussion names and their item count

SPSite site = SPContext.Current.Site;
SPWeb web = site.OpenWeb();
SPListCollection disccontrol = web.Lists;
DataTable dt = new DataTable();
dt.Columns.Add("DiscName", typeof(string));
dt.Columns.Add("DiscCount", typeof(string));
var tot = 0;
foreach (SPList dlist in disccontrol)
{
if (dlist.BaseTemplate == SPListTemplateType.DiscussionBoard)
{
var DiscName = dlist.Title;
var DiscCount = dlist.Folders.Count;
tot += DiscCount;
dt.Rows.Add(DiscName, DiscCount);
}
}
discGrid.DataSource = dt;
discGrid.DataBind();
totItems.Text = tot.ToString();


Get Details from a list using LINQ

var dc = new SPLinqDataContext(SPContext.Current.Web.Url);
var conts = dc.GetList("contacts");
var myquery = from c in conts
select new
{
Name=c.Title,c.Email,c.Mobile
};
mygrid.DataSource = myquery;
mygrid.DataBind();


Get Library Details

SPSite site = SPContext.Current.Site;
SPWeb web = site.OpenWeb();
SPListCollection ls = web.Lists;
var Name = "";
var Count = 0;
var Total = 0;
DataTable table = new DataTable();
table.Columns.Add("Name", typeof(string));
table.Columns.Add("Count", typeof(string));
foreach (SPList list in ls)
{
if (list.BaseTemplate == SPListTemplateType.DocumentLibrary)
{
Name = list.Title;
Count = list.Items.Count;
table.Rows.Add(Name, Count);
Total += Count;
}
}
table.Rows.Add("Total", Total);
dispGrid.DataSource = table;
dispGrid.DataBind();


Get file details from a particular library

SPSite currSite = SPContext.Current.Site;
SPWeb myWeb = currSite.OpenWeb();
SPList mylist= myWeb.Lists["mydoc"];
SPListItemCollection col = mylist.Items;
var FileName="";
var User="";
DataTable table = new DataTable();
table.Columns.Add("FileName", typeof(string));
table.Columns.Add("User", typeof(string));
foreach (SPListItem item in col)
{
FileName = item.Name;
User = item.File.Author.ToString();
table.Rows.Add(FileName, User);
}
myGrid.DataSource = table;
myGrid.DataBind();


Get details from a library using CAML query

string qry = "Your CAML query for library";
SPSite site = SPContext.Current.Site;
SPWeb web = site.OpenWeb();
SPList list = web.Lists["mydoc"];
SPQuery query = new SPQuery();
query.Query = qry;

DataTable dt = new DataTable();
dt = list.GetItems(qry).GetDataTable();
myGrid.DataSource = dt;
myGrid.DataBind();


Get details of a library based on user selected from a dropdown box

protected SPSite site;
protected SPWeb web;
protected SPList myList;
protected SPListItemCollection itemColl;
protected DataTable dt;
protected SPUserCollection users;
protected void Page_Load(object sender, EventArgs e)
{
site = SPContext.Current.Site;
web = site.OpenWeb();
myList = web.Lists["myDoc"];
dt = new DataTable();
dt.Columns.Add("Name", typeof(string));
dt.Columns.Add("Count", typeof(string));
if (!IsPostBack)
{
users = web.SiteUsers;
DDList.Items.Clear();
foreach (SPUser s in users)
{
DDList.Items.Add(s.ToString());
}
bindData();
}
}
protected void bindData()
{
itemColl = myList.Items;
var fname = "";
var auth = "";
foreach (SPListItem item in itemColl)
{
fname = item.Name;
auth = item.File.Author.ToString();
if(auth.Equals(DDList.SelectedItem.ToString()))
dt.Rows.Add(fname,auth);
}
myGrid.DataSource = dt;
myGrid.DataBind();
}
protected void DDList_SelectedIndexChanged(object sender, EventArgs e)
{
bindData();
}


Assigning total count to a footer

if (e.Row.RowType == DataControlRowType.DataRow)
totalItems += Convert.ToInt32(e.Row.Cells[1].Text);
else if (e.Row.RowType == DataControlRowType.Footer)
e.Row.Cells[1].Text=totalItems.ToString();


Save data to field from webpart

SPSite site = SPContext.Current.Site;
SPWeb web = SPContext.Current.Web;
SPList myList = web.Lists["details"];
SPListItem listItem = myList.Items.Add();
listItem["Name"] = txtName.Text;
listItem["Age"] = txtAge.Text;
listItem["Qualification"] = txtQualification.Text;
listItem.Update();
myList.Update();

How to launch a document by clicking a link to the file?

Word: <a href='ms-word:ofe|u|path/to/web/word/document.docx'>Link to document</a> Excel: <a href='ms-excel:o...